Game Development, Snippets, Unity

C# Automatic Enum Building using Reflections

So i don’t like using strings for keys and references when at all possible. I still do it in many places but when I can, I try to use an enum.

Background
I am developing a Navigation System and want to use Views. I want to have events call to switch to the next view and I don’t want to pass around string keys or object references. My Navigation System depends on any object that will be used as a View to extend ViewController. I used that as a jumping off point to create an enum from classes that extend ViewController. Then I save that list to file and I have a new enum.

Here’s the code
I tried to comment to help explain.

// Place this in an Editor folder to make sure we don't include it in a build.
// only showing the using statements for this method. you will need others to write this to a file
using System.Collections.Generic;
using System.Reflection;
using System.Linq;
using System;

public class NavigationViewGenerator
{

    [MenuItem("Window/Generate Navigation View Enum")]
    public static void UpdateViewsList()
    {
        Type type = typeof(ViewController);

        // using Linq to search through the content and get all class that extend ViewController
        List<Type> viewControllers = Assembly.GetAssembly(type).GetTypes().Where(t => t != type && type.IsAssignableFrom(t)).ToList();
        // convert them to string[] so we can join them
        string[] items = Array.ConvertAll<Type, string>(viewControllers.ToArray(), Convert.ToString);

        // construct enum from types
        string contents = "//this files is automatically generated so please don't modify! \n\npublic enum NavigationView\n{\n\tNone,\n\t" + string.Join(",\n\t", items) + "\n}";

        // save out to a file
        SaveFile(contents, "/Scripts/UI/NavigationView.cs");
    }
}

I don’t like the way I have to build the contents of the file so if you know a better way please let me know. Also, right after posting I realized one flaw that I might try to solve later. That flaw is that if you add a view that pushes other items down it will disconnect inspector set items.

Thanks!

Game Development

Learning Unreal: Twin Stick Shooter – Player Rotation

If you have not checked out the previous posts in this series please feel check them out before continuing here.

Overview

In this post will be covering setting up there right joystick input. Rotating the player in the direction of the joysticks input. Lastly, firing a projectile in that direction.

Inputs

Just like the previous set up we need to add two axis mappings to our input settings.One for the RightVertical and one for the RightHorizontal. Remember that the Input settings our under the Edit -> Project Settings. Copy the settings from the image below.

Screen Shot 2015-06-10 at 7.16.41 AM

Player Rotation

We will need to modify our MyPlayer blueprint. Open it up and select the Viewport tab so we can see the changes we are about to make. First off we need to adjust the CameraBoom  otherwise when we rotate the player it will get rotated as well. Select the CameraBoom in the Components panel. Then in the Details panel scroll down to the Camera Settings group and uncheck Inherit Pitch, Inherit Yaw, and Inherit Roll.

Screen Shot 2015-06-11 at 6.31.32 AM

Since we are dealing with direction it would be helpful to know which direction is our player is facing. In the Components panel click + Add Component dropdown and select Static Mesh. Rename the component to Gun. Also, position and scale it to be similar to a gun.

Screen Shot 2015-06-11 at 6.36.48 AM

Add a Scene Component and name it GunTip. Drag and drop this on the Gun component to make the Gun the parent of GunTip. Then position the GunTip to be at the tip of the Gun.

Screen Shot 2015-06-11 at 6.43.09 AM

Be sure to compile and save. It appears that somethings aren’t exposed until you compile. Since we are now going to the Event Graph I want all the changes to the components to be available in the blueprint. Select Event Graph tab. We are going to add some local variables to store information as we are processing through our visual code. In My Blueprint panel under the Variables click the + to add your new variable. Name it Target Forward. In the Details panel and change the Variable Type to Vector.

Screen Shot 2015-06-11 at 6.55.09 AM

Here is a list of the the other variables we need and their types. I will also include their default value if it has something other than default. You may need to compile to set the default value.

  • Current Rotation (Rotator) view
  • Target Rotation (Rotator) view
  • Rotation Multiplier (Float): 10.0 view

The variable list should look something like the image below.

Screen Shot 2015-06-11 at 6.59.44 AM

We are going to use the input events for the right joystick to handle rotation. We get a X and Y value from the two axises. So we need to store that value.

Screen Shot 2015-06-11 at 6.48.18 AMSo here we are taking breaking the Target Forward variable into it’s axises so we can just set the value that has change when we receive the input event.

We need to convert that into a rotation so we can apply it to the player. Let’s create a function to do this. In the My Blueprints panel click the +  next to the Functions. Name it Direction to Rotation. That should have opened the function blueprint. This works pretty much exactly like the Event Graph. In the Detail panel at the bottom there are Inputs and Outputs. Our function doesn’t need any Inputs but we do want to add a Rotator. Click New in the Outputs group. Name it Rotation and set it’s variable type to Rotator. Now this method will take our forward and convert it to a rotation. Then we return that value. So your method should look something like below.

Screen Shot 2015-06-11 at 7.44.41 PM

Go back to the Event Graph and add the following nodes.

Screen Shot 2015-06-11 at 7.47.07 PMCompile and Save and the hit Play. If you use the arrow keys you should now be able to have the player point in the direction of the arrows pressed.

Smoothing It Out

I thinks thinks are a little too quick. I don’t want my character to snap to a direction I want him to smoothly travel to that direction. So we are going to make this a little bit more elaborate. Return to the Direction to Rotation function. Modify it to not return the value but to store it in as Target Rotation. Then remove the output node.

Screen Shot 2015-06-14 at 7.29.33 AM

Create a new function called Lerp Rotation. This function will store our current rotation and rotate it towards target rotation using delta time.

Screen Shot 2015-06-14 at 7.50.55 AMModify the Event Graph to include the new function.

Screen Shot 2015-06-14 at 7.52.09 AM

Compile and Save. Then test and see what our changes accomplished. You should see a much smoother turn on the player but it seems that when you release the arrow keys he moves back to his starting rotation. That is not what we want but so we will need to check if the joystick has acceptable values and only then update the Target Rotation.

Create a new Boolean variable and name is Input Changed.  Then add a new function called Check Input and match the picture below.

Screen Shot 2015-06-14 at 8.02.17 AM

Modify the Event Graph to include the new method and now update the Target Rotation if Check Input is true.

Screen Shot 2015-06-14 at 8.06.06 AM

Compile and Save. Test your game and verify that the character does keep his current rotation when you are not holding any input.

Firing

First we need to create a particle to fire. So lets go back to our Content Browser and Add New. Select Blueprint Class. We are going to use Actor blueprint parent. Name is MyProjectile.

I am going to just use a sphere to present my projectile. Add the Sphere component in the Components. Also add the Projectile Movement. With the Projectile Movement selected change the following settings in the Details panel.

Screen Shot 2015-06-14 at 10.38.57 AM

In the Event Graph we are going to add a lifetime so it will be destroyed. This accomplishes a couple of goals. First, it allows us to get them out of the level because we will kill the fps if we leave them on stage. Second, it allows us to limit the range we can shoot. Create a Life Span variable with a default value of 2.0. Update your Event Graph to look like the image.Screen Shot 2015-06-14 at 9.39.10 AM

Next we will create a way to shoot this projectile. You can Compile and Save. Then return to the MyPlayer Event Graph and add the method Fire ProjectileI also added two float variables, FireTimer  and FireDelay.

Screen Shot 2015-06-21 at 11.48.09 PMLastly, add the new function after the Set Actor Rotation.

Screen Shot 2015-06-21 at 11.56.10 PMConclusion

So that wrap it up we covered rotating the player towards the right joystick and move fire a projectile. You should be able to Compile and Save and then Test.

Game Development

Unity Gizmo Woes

The other day I was working on a scene full of Unity Gizmos. Which is great if you need to select one of those items. But I was trying to replace the light probes and the Gizmos were just noise that interfered with my probe placement. Now gizmos are helpful when used properly and these were not. Luckily, these were all nested under a GameObject so that I could disable. Here are some helpful tips on what gizmos are and how to use them.

Overview

Gizmos are a way to easily identify and select things in the scene. Unity has built in gizmos for common things like cameras, particle systems, lights, and audio sources. They have also provided a simple way to create selectable gizmos for objects and for components. You can also make custom gizmos for debugging purposes but we won’t be covering that in the post.

Object Gizmo

This maybe obvious but object gizmos is for only one object. That means if you activate the gizmo for that object and duplicate a 100 times you have to go either disable those objects or turn of the gizmos for each of those objects, with exception to prefabs. You can set object level gizmo at the top of the inspector.

Object-Level-Gizmo

This works well until you have a lot of them and want to disable them. So I usually prefer Component Gizmos.

Component Gizmos

Component gizmos have two requirements:

  • That the object has a component/script attached.
  • That script has the OnDrawGizmos method.

Here is my Collectable.cs  script.

using UnityEngine;
using System.Collections;
 
public class Collectable : MonoBehaviour 
{
	void OnDrawGizmos() {}
}

That is all the code you need to use the gizmos drop down to assign a gizmo to your component. Make sure to have a the component/script attached to a GameObject in the Hierarchy. Now in the Scene View hit the gizmos drop down and you should see your Script listed.
ComponentLevelGizmo

If you don’t see it, that probably means you have the object selected. Unlike the object level gizmos, these hide when selected. The benefits of this method is that you can select the gizmo icon on the right side of the gizmo drop down and turn off the gizmo of all associated components. I prefer this method.

Summary

Now that pretty much covers the most common uses of the built in gizmos. Gizmos have a lot of benefits and this just scratches the surface. In my opinion use the component level gizmos. Though they take slightly more work the features they provide are more helpful in the long run. Let me know what you think.

Tutorial

Learning Unreal: Twin Stick Shooter – Player Movement

If you missed the setup process please head back over to the Intro/Setup post.

Plan

  • Define Inputs
  • Intro to Event Graph
  • Implement Player Movement
  • Add a comment

Player movement should be pretty easy to cover so I am hoping this will turn out to be a shorter post. Make sure you open your project and get to the point we left off in the last tutorial.Screen Shot 2015-06-08 at 12.26.46 PM

Define Inputs

From here we need to setup the inputs we are going to use for handling movement. So select Edit in the top-level menu and then Project Settings.Screen Shot 2015-06-08 at 12.28.30 PMOn the left side under Engine select Input.Screen Shot 2015-06-08 at 12.29.23 PMClick the + next to Axis Mappings.  This adds a little arrow to the left side of the Axis Mappings label that expands for more details. Click that arrow. In the field change NewAxisMapping_0 to LeftVertical. Then in the drop down below it select Gamepad Left Thumbstick Y-Axis and leave the scale as 1.0. Add to the axis the keyboard keys W: 1.0 and S: -1.0. This will allow us to use the W key and the S key for forward and backward movement. Do the same for the LeftHorizontal. See image below.Screen Shot 2015-06-09 at 5.51.35 AM

Intro to Event Graph

Now that we have the inputs setup lets go into our blueprint. Open up MyPlayer blueprint and select the Event Graph tab. The Event Graph is your programming interface. Most of the methods you need to make a game are exposed. There are a lot of tutorials on this visual scripting and that is because it is powerful enough to use for an entire game.

I know that the Tick event is the equivalent to Update so we could use that to process input. That would work, but Unreal creates events for the axis we created so we will listen for those instead of utilizing the Tick event.

Unreal was nice enough to add events when we added our Axis Mappings. Let’s start by adding those event to our event graph. Right click in the Event Graph and you should get a window titled All Actions for this Blueprint. Search in that window for LeftVertical. You should see two options. The first one being an event and the other being the value. Make sure to select the event.Screen Shot 2015-06-09 at 7.01.46 AM

What we have created is an Event Dispatcher and the different pins are outlined in the image below.

Screen-Shot-2015-06-09-at-7.05.44-AM

Delegate we will cover at another time so leave that on the back burner. The Execution Order is how you control the order of items being called with in your script. Output pin is the values or objects that this node is returning. In this cause it gives us the value of the LeftVertical Axis. What I don’t Input Pins visible here because events don’t have them. Input Pins are just like Output Pins but receive input. Obvious I know! Let’s use this event. Drag from the Execution Order node and release it in some empty space next to the event. This should show you the All Actions for this Blueprint windows againSearch for Add Movement Input and select the node to add it to the Event Graph.Screen Shot 2015-06-09 at 7.22.04 AM

We want our LeftVertical axis to control our forward and backwards direction. That means we need it to affect the X-axis of our player. On the Add Movement Input node change World Direction to X: 1.0, Y: 0.0, Z: 0.0. Then drag the Axis Value Output Pin to Scale Value Input Pin.

Remember unreal coordinate system has X as Forward, Y as Right, and Z as Up.

Screen Shot 2015-06-09 at 7.26.16 AM

No repeat the same process for the LeftHorizontal setting the World Direction to X: 0.0, Y: 1.0, Z: 0.0.Screen Shot 2015-06-09 at 7.30.38 AM

We should have a character that moves now but lets do a little house cleaning before we go test. Drag a selection rectangle around all four nodes. With all of them select hit the key on your keyboard. This is how we add a comment in our Event Graph. Change the name of the comment to Movement.Screen Shot 2015-06-09 at 7.35.02 AM

Time to see if it made a difference. Be sure to Save and Compile. Then close your MyPlayer blueprint window and click Play on your level. You should now be able to use WASD to move the player around.

Summary

We added our own Input Axises and utilized their events in the Event Graph. Learned a little about Graph Nodes and commenting. Let me know if you have any trouble and I will do my best to keep churning out the tutorials.

Tutorial

Learning Unreal: Twin Stick Shooter – Intro/Setup

In this series, I am trying to use blogging as a motivation to continue learning the unreal engine. Naturally, one downside to that is that I may figure out better ways of doing something as I gain more perspective. I will do my best to update these posts as I learn more. Also feel free to comment below if you have any ideas or know a better way of doing something. I will try to include anything I believe helps the learning process. Currently  I am using version 4.7.6 of Unreal Engine 4. If you find yourself using a new version you might have to figure out how to accomplish the same functionality in that version.

Plan

  • Create Player Blueprint
  • Add Camera Boom
  • Add Camera
  • Setup Scene
  • Change Instance of a Blueprint

Project Setup

Lets create a new Blank Blueprint Project. I am calling my project MyTwinStickShooter. I am creating my project as a Mobile/Tablet with Scaleable 3D or 2D. I am doing this because I am running this on a Macbook Pro that can’t handle the features that Unreal pushes out for Desktop/Console. If you machine can handle more than feel free to upgrade the settings.CreateProject

Right now we have a great starting point for a first person game. Not super helpful. Also note that I could have started with the Twin Stick Shooter template but what’s the fun in that? When I am learning I like to do it the hard way mainly because I like to know how things work.

Player Setup

Lets create  folder called Blueprints. Right click in the Content Browser or click Add New then select New Folder. Name it Blueprints.Add New Folder

Go into the Blueprints folder and click Add New then Blueprints Class.New Blueprint

If you are coming from Unity, blueprints are kind of like prefabs. I say “kind of” because in Unity you usually make a prefab after you make the first iteration and then want to duplicate it. With Unreal it seems that an think you want to add code to is a blueprint. From what I have experienced so far this would be the equivalent to taking each top-level item in a Unity Hierarchy and making them into a prefab. Also by default the Components (Hierarchy) you create in a blueprint is not exposed to the World Outliner. So, unlike Unity, dragging things inside and outside of prefabs/blueprints is not possible. It’s pretty logical when you think about the structure of unreal but it is a difference.

Select Character as the Parent class for our blueprint. And name the newly created blueprint MyPlayer.Parent Classs

Let’s now open the MyPlayer blueprint and start changing the default values. Double click to open the blueprint. Now in my version of unreal it opens straight to the Class Defaults section and as an option to go to Open Full Blueprint Editor. Since we will be affecting the structure of this component I am going to go ahead and click that link.Default Settings

Make sure you are in the Viewport tab so you can see the changes as you update the components.  Then in the Components panel select Mesh(Inherited).Select Mesh

Now on the right side in the Details Panel scroll down to the Mesh group (not the Skeletal Mesh group) and click on the drop down for Skeletal Mesh.  For me the drop down is empty. I am not currently planning on doing an art pass on this project, so I want to keep things as simple as possible. All I need is a cube. It just so happens that the engine content has a skeletal mesh that is a cube. So let’s enable engine content. The window that showed up when you clicked the drop down for the skeletal mesh is the Current Assets window.  At the bottom right corner of the Current Assets window select View Options and make sure that Show Engine Content is checked. Once this is checked you should now be able to select SkeletalCube.

Now you may see your cube is a little small for your collider so lets  position and scale it to fit. Copy the values from the Transform group show in the picture.Position/Scale

Let’s go ahead and add a camera so we can see our new player. This is a temporary camera because I want my camera for this game to be slightly smarter. So for now we will add a boom to the character and attach a camera to that boom.

Still in the MyPlayer blueprint make sure you are still looking at the Viewport to see how the changes affect the blueprint. Over in the Components panel click + Add Component and search for Spring Arm and add that component. Rename the Sprint Armto CameraBoom. Set the rotation for the CameraBoom to y: -50.Camera Boom

Next we need to add the Camera. So repeat the steps to add component and search from camera. Drag the Camera on top of the CameraBoom so that the Camera is parented to the CameraBoom. Then make sure you set all of the Transform values to default.Camera Settings

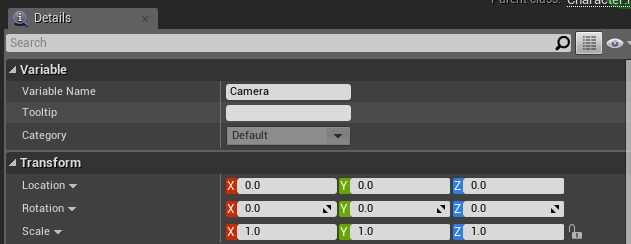
Your Components panel should now look something like this:Player Panel

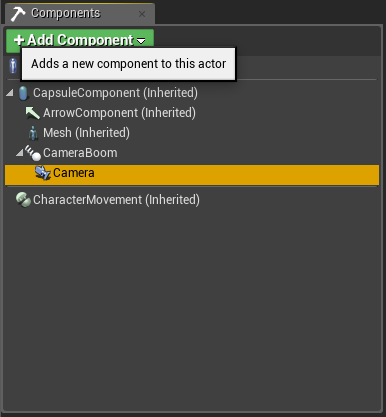
And your viewport like this:Viewport after camera setup

One last note before we can test this sample, is that we need to make sure that if we put this player in the scene he will be the player that the system uses. Select MyPlayer(self) in the Components panel. Then in the Details panel under Pawn look for Auto Possess Player and set it to Player 0.Player 0

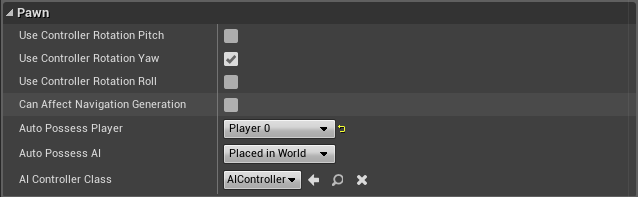
Now would be a great time to compile and save the blueprint. Then you can close the blueprint tab.

Scene Setup

Now that we have our player setup lets make sure the scene is setup and knows about our player.

Just to make sure we are in the same place we start with the Default Level. To do that select File -> New Level. Select the one that says DefaultScreen-Shot-2015-06-08-at-9.18.28-PM

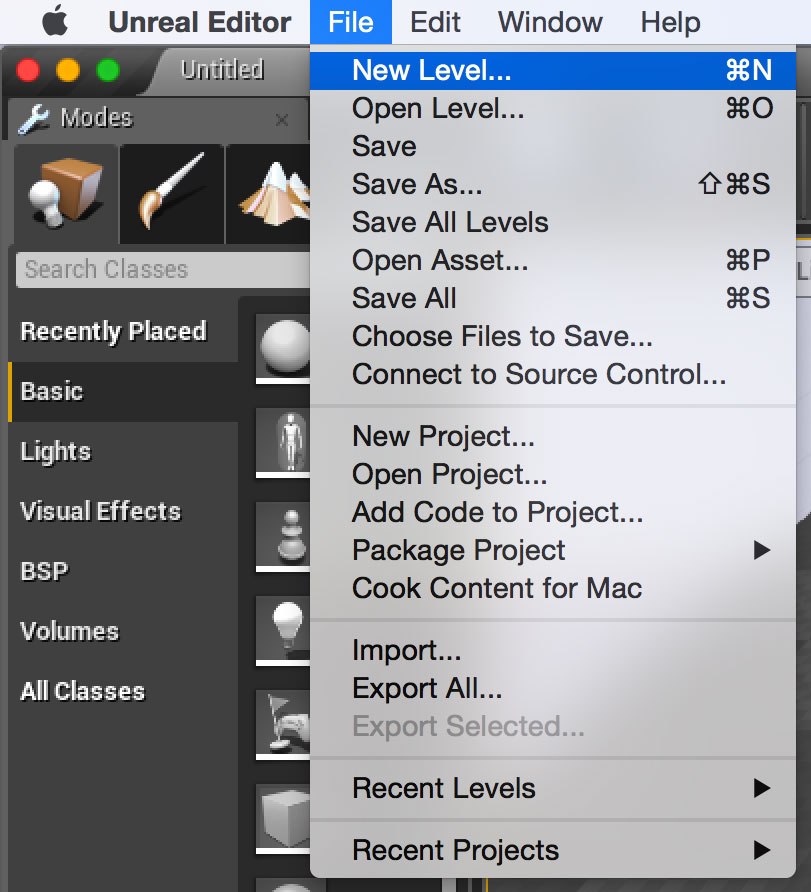
First off I want the floor to be bigger so I am going to select the Floor in the World Outliner panel and change the scale to x: 10, y:10, z:1Floor Setup

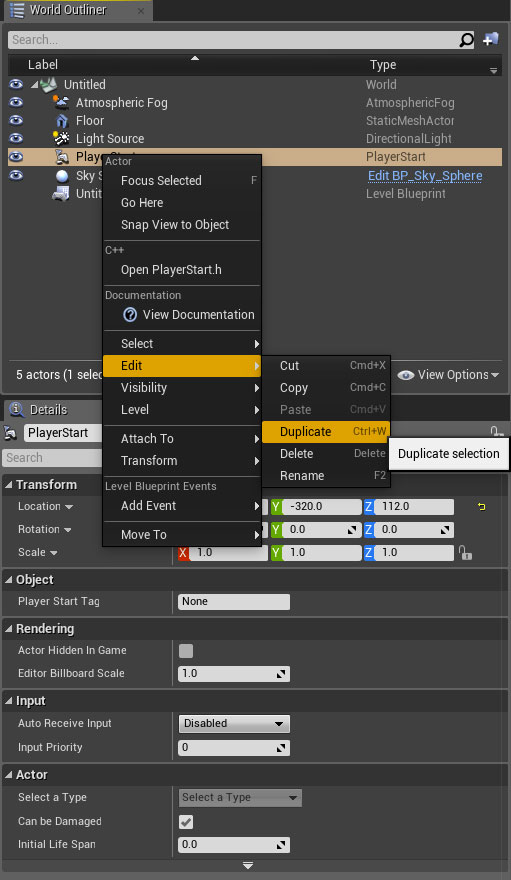
Next let’s get rid of the PlayerStart actor because we don’t currently want to dynamically add our player. Instead, we are going to have him already in the scene. Right click on PlayerStart in the World Outliner and select Edit->Delete.

I am doing it in this way because it make more since to me at this stage and correlates to my understanding coming from Unity.

Remove Player Start

All that is left is to add MyPlayer to the scene. Drag MyPlayer blueprint into the scene. Unreal automatically snaps him to the floor so all we need to do is change his x and y position to be in the middle of the floor.Myplayer position

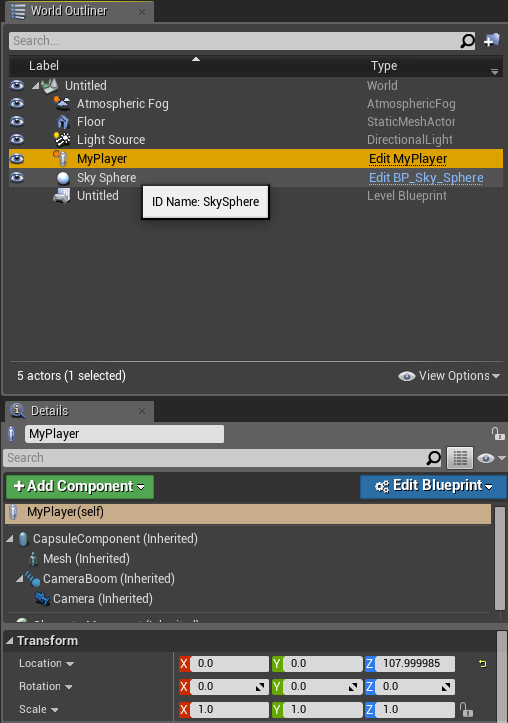
Lets hit play and see what we have. Now this doesn’t do much because we haven’t added any functionality. It is just a simple scene. So it looks something like below. (If you need to exit play mode you can always hit escape)First Pass

Well that’s all good and all, but let’s make it a bit easier to look at. Make sure you stop the simulation and open the MyPlayer blueprint (remember you can hit escape to exit play mode). Select the Mesh(Inherited) and under the Details panel. In Materialsgroup click the drop down and select BasicAsset01.Screen Shot 2015-06-08 at 8.16.44 AM

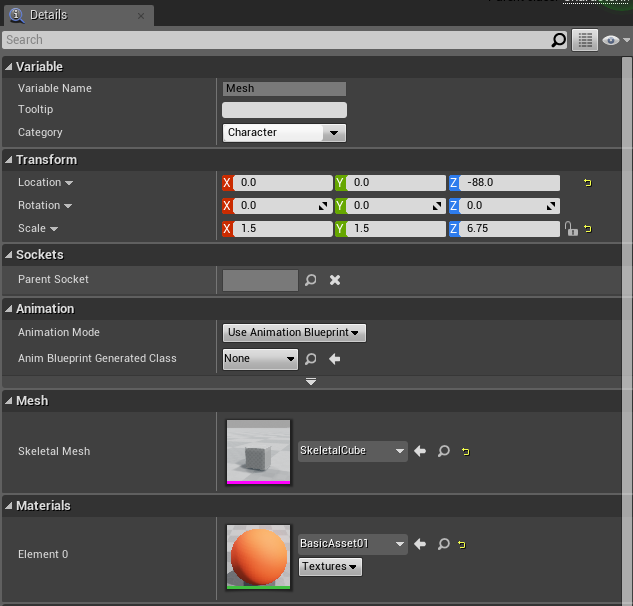
I also want to have the camera be further back so lets increase the length of the boom. Select CameraBoom and set the Target Arm Length to 1000. Compile and Save and close the blueprint tab.Screen Shot 2015-06-08 at 8.22.46 AM

Now you will notice that your player in scene doesn’t reflect our new changes. This is because it is an instance. You will have to reset it to the blueprint for it to work. Make sure you have MyPlayer selected in the World Outliner panel and in the Details panel there is a blue dropdown that says Edit Blueprint.  Select Reset Instance Changes to Blueprint Default,and now your instance use the correct material.Material

I think that is a good start to the tutorial. Make sure you save your scene. I saved my as MyLevel.

Summary

We covered creating a player blueprint that has a camera with boom attached. Set the player in a simple scene. We also demonstrated how to update blueprint instances. Let me know what you think and next time we will get into movement. Also let me know if I am being too detailed or not detailed enough.

Uncategorized

Introductions

I am trying to get into blogging so I am going to focus on things that I am learning and hopefully whoever stumbles on this info will find it interesting. Feel free to contribute in the comments and let me know if there are any topics you might be interested so I can have a back log of ideas to work on.