If you missed the setup process please head back over to the Intro/Setup post.
Plan
- Define Inputs
- Intro to Event Graph
- Implement Player Movement
- Add a comment
Player movement should be pretty easy to cover so I am hoping this will turn out to be a shorter post. Make sure you open your project and get to the point we left off in the last tutorial.
Define Inputs
From here we need to setup the inputs we are going to use for handling movement. So select Edit in the top-level menu and then Project Settings. On the left side under Engine select Input.
 Click the + next to Axis Mappings. This adds a little arrow to the left side of the Axis Mappings label that expands for more details. Click that arrow. In the field change NewAxisMapping_0 to LeftVertical. Then in the drop down below it select Gamepad Left Thumbstick Y-Axis and leave the scale as 1.0. Add to the axis the keyboard keys W: 1.0 and S: -1.0. This will allow us to use the W key and the S key for forward and backward movement. Do the same for the LeftHorizontal. See image below.
Intro to Event Graph
Now that we have the inputs setup lets go into our blueprint. Open up MyPlayer blueprint and select the Event Graph tab. The Event Graph is your programming interface. Most of the methods you need to make a game are exposed. There are a lot of tutorials on this visual scripting and that is because it is powerful enough to use for an entire game.
I know that the Tick event is the equivalent to Update so we could use that to process input. That would work, but Unreal creates events for the axis we created so we will listen for those instead of utilizing the Tick event.
Unreal was nice enough to add events when we added our Axis Mappings. Let’s start by adding those event to our event graph. Right click in the Event Graph and you should get a window titled All Actions for this Blueprint. Search in that window for LeftVertical. You should see two options. The first one being an event and the other being the value. Make sure to select the event.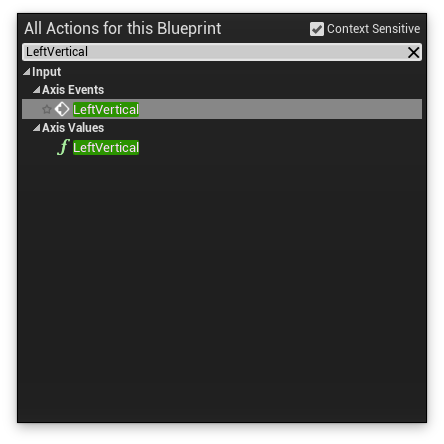
What we have created is an Event Dispatcher and the different pins are outlined in the image below.
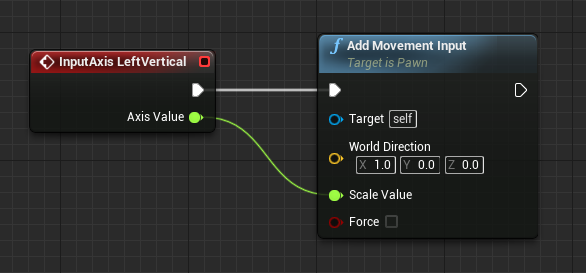
Delegate we will cover at another time so leave that on the back burner. The Execution Order is how you control the order of items being called with in your script. Output pin is the values or objects that this node is returning. In this cause it gives us the value of the LeftVertical Axis. What I don’t Input Pins visible here because events don’t have them. Input Pins are just like Output Pins but receive input. Obvious I know! Let’s use this event. Drag from the Execution Order node and release it in some empty space next to the event. This should show you the All Actions for this Blueprint windows again. Search for Add Movement Input and select the node to add it to the Event Graph.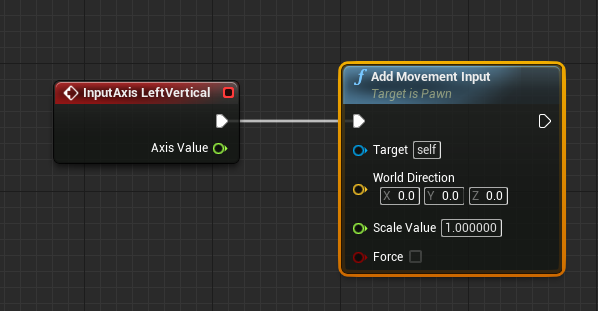
We want our LeftVertical axis to control our forward and backwards direction. That means we need it to affect the X-axis of our player. On the Add Movement Input node change World Direction to X: 1.0, Y: 0.0, Z: 0.0. Then drag the Axis Value Output Pin to Scale Value Input Pin.
Remember unreal coordinate system has X as Forward, Y as Right, and Z as Up.
No repeat the same process for the LeftHorizontal setting the World Direction to X: 0.0, Y: 1.0, Z: 0.0.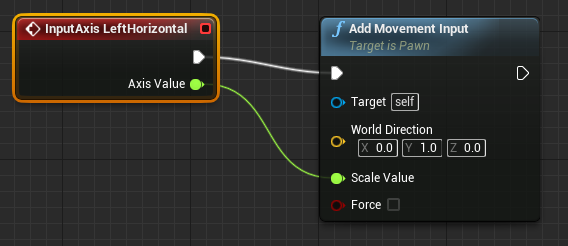
We should have a character that moves now but lets do a little house cleaning before we go test. Drag a selection rectangle around all four nodes. With all of them select hit the C key on your keyboard. This is how we add a comment in our Event Graph. Change the name of the comment to Movement.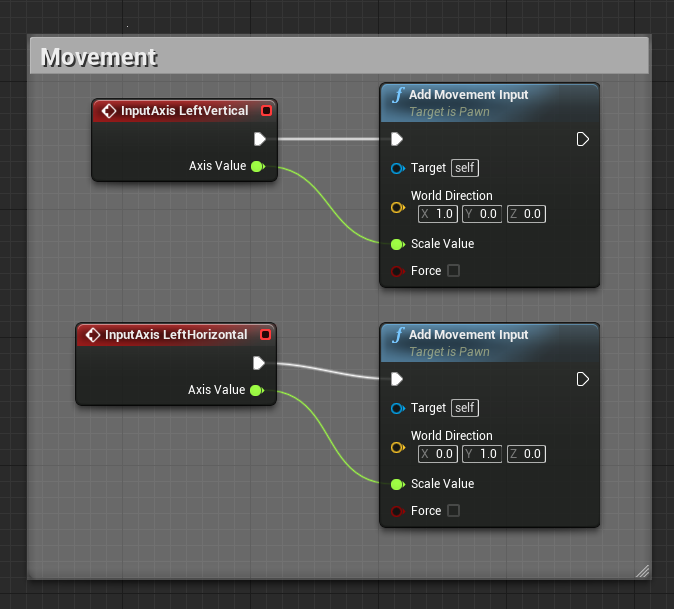
Time to see if it made a difference. Be sure to Save and Compile. Then close your MyPlayer blueprint window and click Play on your level. You should now be able to use WASD to move the player around.
Summary
We added our own Input Axises and utilized their events in the Event Graph. Learned a little about Graph Nodes and commenting. Let me know if you have any trouble and I will do my best to keep churning out the tutorials.

One thought on “Learning Unreal: Twin Stick Shooter – Player Movement”